GKEにIstioをインストールしてgRPCでSSL/TLS通信できるようにする
Kubernetes(k8s)で複数の機能をもったサーバが相互通信をしている環境を運用しているとサーバ間通信を制御したり監視する必要が出てくるので、GKE(Google Kubernetes Engine)にIstioを導入しました。
Istioの特徴として、Istio on GKEのOverviewによると以下の特徴があります。
- Automatic load balancing for HTTP, gRPC, WebSocket, MongoDB, and TCP traffic.
- Fine-grained control of traffic behavior with rich routing rules, retries, failovers, and fault injection.
- A configurable policy layer and API supporting access controls, rate limits, and quotas.
- Automatic metrics, logs, and traces for all traffic within a cluster, including cluster ingress, and egress.
- Secure service-to-service communication in a cluster with strong identity based authentication and authorization.
GKEにIstioを導入するにはGCPがよしなにやってくれるIstio on GKEと、マニュアルでインストールするパターンがあるのですが、今回はマニュアルで導入しました。Istio on GKEはIstioを自分でインストールしなくて楽なのですが、その分カスタマイズがしにくいです。GKEのKubernetesのバージョンにIstioのバージョンが紐付いているので、GKEを上げて、Istioのバージョンもあがるとこちらで設定した値がもとに戻ってしまします。その他にも最低限の機能しかインストールされていないので拡張したい場合に面倒です。バージョンも固定されているので新しい機能が取り込みにくいです。
GKEにマニュアルでIstioを導入するのは少々骨がおれますがその分カスタマイズしやすいしコントロールしやすいです。今回はIstioをどのように導入してどのようにgRPCでSSL/TLS通信出来るようにしたのか説明します。
使用した主なサービス
今回使ったサービスは以下です。
- GKE: 1.13.11-gke.14
- Istio: 1.4.0
- Cloud DNS
構成
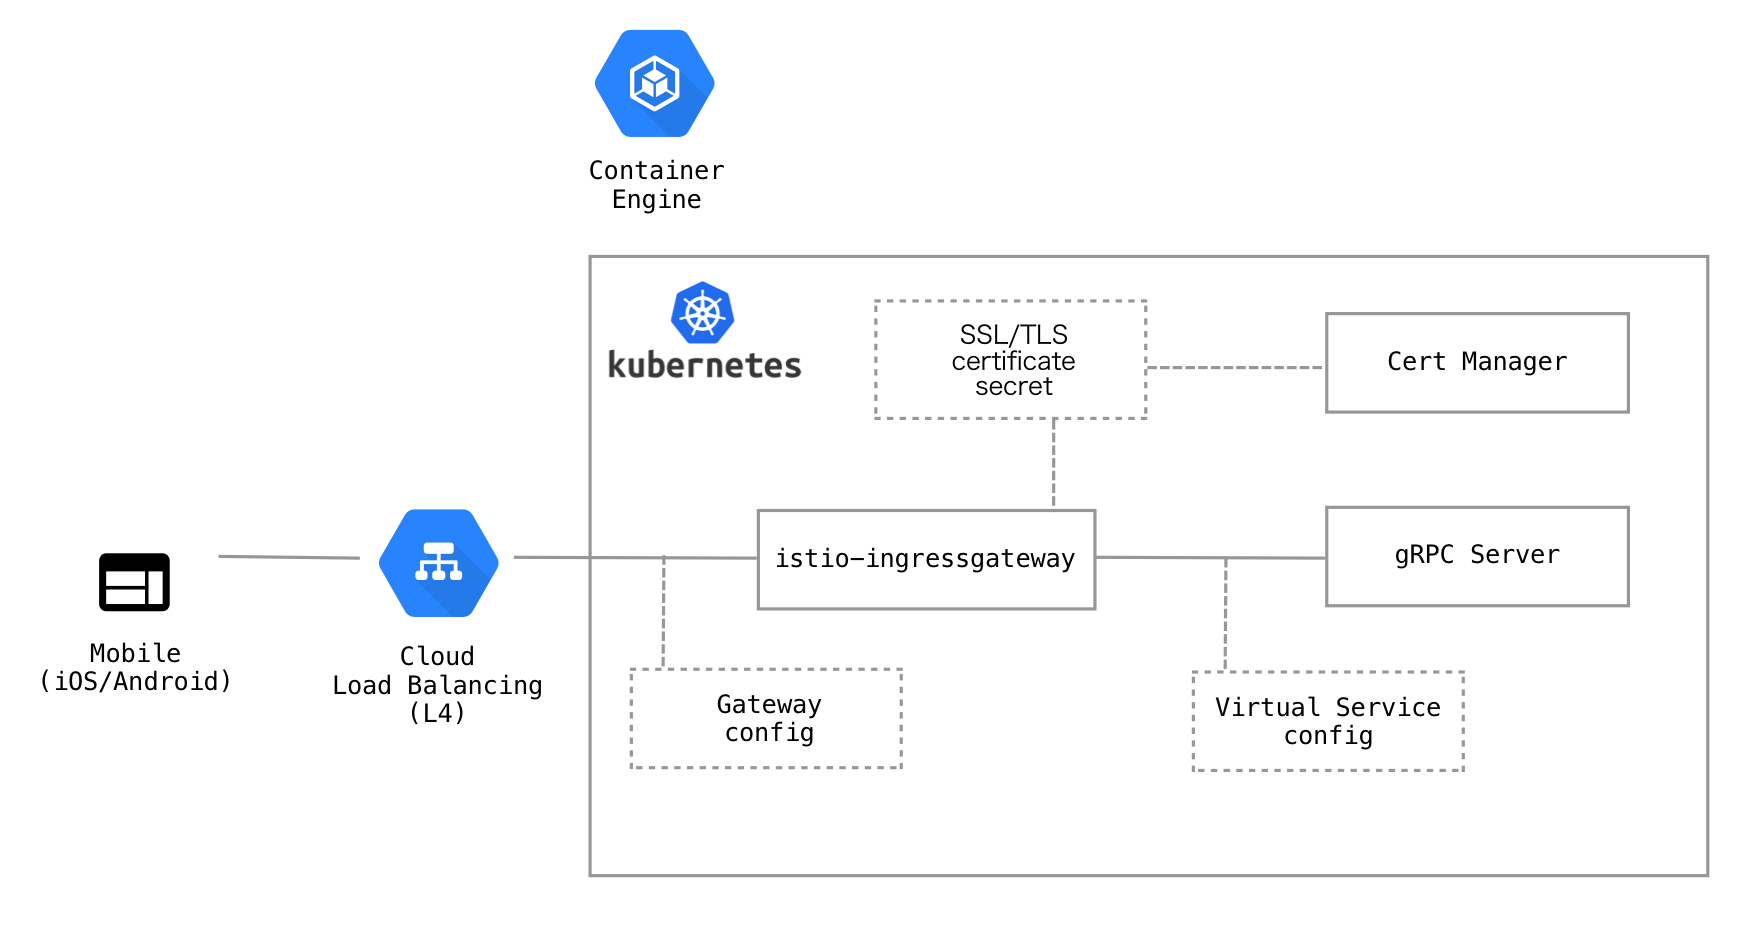
構成は上記のようになっています。Cloud Load Balancing(L4)の後ろにistio-ingressgatewayがいます。Gatewayの設定でこの間のルーティングを制御します。istio-ingressgatewayが各バックエンドのサービスにトラフィックを割り振ります。この設定はVirtual Serviceの設定で行います。証明書はcert-managerが取得します。DNSはGCPのCloud DNSを使っていたのでDNSにレコードを追加して証明書を取得する(DNS-01 challenge)を使用できました。HTTP-01 challengeと違いDNSを利用する場合、ルーティングの設定を変えなくていいので楽です。cert-managerが証明書を作成し、特定の名前でk8sのsecretとして保存し、 istio-ingressgatewayを設定すると証明書として使用できます。
今回はCloud Load BalancingはL4を使いました。HTTP(S) Load Balancing(L7)を使う方法もあると思いますが、HTTP2のヘルスチェックがうまく設定できなかったのでL4を使いました。HTTP(S) Load Balancingで設定できると、SSL/TLS証明書も、cert-managerを使わずにk8sの設定でできたり、Cloud IAPが使えてステージングでは認証を必要とするみたいなことが簡単にできるのですが、ひとまずL4を使っています。また時間ができたら試してみたいと思います。
インストール
IstioのインストールはHelmを使うので、あらかじめインストールしておきます。Helm 3からTillerが必要なくなったので、より使いやすくなりました。ローカル環境がMacなのでHomebrewでインストールしました。
Istioのインストール
Istioはistioctlでインストールする方法とHelmでインストールする方法があります。istioctlでインストールを試した際にうまくいかなかったので、Helmでインストールしました。Helmでのインストールは将来廃止される予定だそうですが、その際はistioctlでのインストールに移行する必要があります。
最初はIstioをデフォルトでインストールします。まずHelmのレポジトリにIstioを追加します。
$ helm repo add istio.io https://storage.googleapis.com/istio-release/releases/1.4.0/charts/

$ helm search repo istio.io
NAME                    CHART VERSION   APP VERSION     DESCRIPTION
istio.io/istio          1.4.0           1.4.0           Helm chart for all istio components
istio.io/istio-cni      1.4.0           1.4.0           Helm chart for istio-cni components
istio.io/istio-init     1.4.0           1.4.0           Helm chart to initialize Istio CRDs
追加すると、istio、istio-cni、istio-initのチャートがあります。今回、istio-cniプラグインはつかいません。
istioはistio-systemというk8sのネームスペースにインストールするのであらかじめ作っておきます。
$ kubectl create namespace istio-system
istio-initをインストールします。cert-managerもインストールするのでinit-values.yamlの設定ファイルを読み込ませて実行しています。
$ helm install istio-init --namespace istio-system istio.io/istio-init --values kubernetes/istio/init-values.yaml
certmanager:
  enabled: true
istio-initのチャートはここにあり、Custom Resource Definitions(CRD)を作ったりと、istioをインストールする下準備をしています。
次にIstio自体をインストールします。values.yamlはここをベースにして、おもに監視を強化できる設定にしています。GKEなのでStackDriverと連携すると監視が楽なので設定しています。
helm install istio --namespace istio-system istio.io/istio --values kubernetes/istio/values.yaml
global:
  proxy:
    tracer: "stackdriver"

kiali:
  enabled: true
  createDemoSecret: true

grafana:
  enabled: true

certmanager:
  enabled: true
実行してしばらくすると立ち上がるのでVerifying the installationを参考にして正しくインストールできたか確認します。
Istioの機能を最大限発揮するためには、EnvoyのプロキシをサイドカーとしてgRPCサーバのPodに入れる必要があります。特定のk8sネームスペースに自動でIstioのサイドカーをインジェクトできるようにするために以下のコマンドを実行します。今回はdefaultネームスペースで適用します。
$ kubectl label namespace default istio-injection=enabled
最後に、Enabling Stackdriver Monitoringにしたがって、IstioのメトリックスをStackdriver Monitoringに送れるようにします。確認できるメトリックスはIstio metricsにあります。
これでIstioはインストールできました。
HTTPサーバで疎通確認する
HTTPサーバを動かしてIstioの疎通確認をします。GitHubのGoogleCloudPlatform/istio-samplesに、helloserverというHTTPサーバがあるので、これをk8sのサービスとしてデプロイします。以下のようにちょっと修正を加えます。
注意: 今後の説明でexampleと書いてあるところはプレースホルダーなので、適宜かえてください。
FROM python:3-slim as base
FROM base as builder
RUN apt-get -qq update \
    && apt-get install -y --no-install-recommends \
        g++ \
    && rm -rf /var/lib/apt/lists/*

# Enable unbuffered logging
FROM base as final
ENV PYTHONUNBUFFERED=1

RUN apt-get -qq update \
    && apt-get install -y --no-install-recommends \
        wget

WORKDIR /helloserver

# Add the application
COPY . .

EXPOSE 8080
ENTRYPOINT [ "python", "server.py" ]
apiVersion: apps/v1
kind: Deployment
metadata:
  name: helloserver
spec:
  selector:
    matchLabels:
      app: helloserver
  replicas: 1
  template:
    metadata:
      labels:
        app: helloserver
    spec:
      terminationGracePeriodSeconds: 5
      restartPolicy: Always
      containers:
      - name: main
        image: gcr.io/example/helloserver:1.0.0
        imagePullPolicy: Always
---
apiVersion: v1
kind: Service
metadata:
  name: hellosvc
spec:
  selector:
    app: helloserver
  ports:
  - name: http
    port: 80
    targetPort: 8080
DockerfileをビルドしてGCRにプッシュします。
$ docker build -t gcr.io/example/helloserver:1.0.0 .
$ docker push gcr.io/example/helloserver:1.0.0
GatewayとVirtual Serviceを設定してk8sに適用します。
apiVersion: networking.istio.io/v1alpha3
kind: Gateway
metadata:
  name: example
  namespace: default
spec:
  selector:
    istio: ingressgateway
  servers:
  - port:
      number: 80
      name: http
      protocol: HTTP
    hosts:
    - "*"
apiVersion: networking.istio.io/v1alpha3
kind: VirtualService
metadata:
  name: example
  namespace: default
spec:
  gateways:
  - example
  hosts:
  - "*"
  http:
  - route:
    - destination:
        host: hellosvc
        port:
          number: 80
ドメインはCloud DNSを使っているのでドメインにCloud Load BalancingのIPアドレスを設定します。IPアドレスはk get svc istio-ingressgateway -n istio-systemを実行して、EXTERNAL-IPに設定されている値です。
正しく設定できたか確認のため、curlで値を取得するといいです。
cert-managerでSSL/TLS証明書を作成
Istioでcert-managerを使って証明書を取得して、設定するに以下のステップで行います。
cert-managerで証明書を取得します。Icert-managerはGCPのCloud DNSにアクセスする必要があるのでGCPのWebコンソールで、サービスアカウントを作って、DNS Administratorの権限をあたえて、JSONのキーファイル(key.json)を取得します。それを以下のコマンドでk8sのsecretに保存します。
$ kubectl create secret generic -n istio-system cert-manager-service-account --from-file=key.json
Issuerを定義してk8sに適用(kubectl apply -f issuer.yaml)します。この設定ではLet's Encryptのステージング設定ではないので、Rate Limitsが厳しいです。初めてやる場合は、ステージング設定でためしてから本番設定にするといいです。
apiVersion: certmanager.k8s.io/v1alpha1
kind: Issuer
metadata:
  name: letsencrypt-production
  namespace: istio-system
spec:
  acme:
    server: https://acme-v02.api.letsencrypt.org/directory
    email: account@example.com
    privateKeySecretRef:
      name: letsencrypt-production
    solvers:
    - selector: {}
      dns01:
        clouddns:
          project: example
          serviceAccountSecretRef:
            name: cert-manager-service-account
            key: key.json
Certificateを定義してk8sに適用(kubectl apply -f certificate.yaml)します。secretNameは必ずistio-ingressgateway-certsにしてください。設定し、正しく証明が取得できると、istio-ingressgatewayの/etc/istio/ingressgateway-certsに証明書がマウントされます。
apiVersion: certmanager.k8s.io/v1alpha1
kind: Certificate
metadata:
  name: example
  namespace: istio-system
spec:
  secretName: istio-ingressgateway-certs
  issuerRef:
    name: letsencrypt-production
  commonName: example.com
  dnsNames:
  - example.com
GatewayにSSL/TLSの設定をしてk8sに適用します。
apiVersion: networking.istio.io/v1alpha3
kind: Gateway
metadata:
  name: example
  namespace: default
spec:
  selector:
    istio: ingressgateway
  servers:
  - port:
      number: 80
      name: http
      protocol: HTTP
    hosts:
    - "*"
  - port:
      number: 443
      name: https
      protocol: HTTPS
    tls:
      mode: SIMPLE
      serverCertificate: /etc/istio/ingressgateway-certs/tls.crt
      privateKey: /etc/istio/ingressgateway-certs/tls.key
    hosts:
    - "*"
gRPCサーバのインストール
gRPCサーバはgrpc-greeter-goを使います。serverフォルダにあるサーバを先程のHTTPサーバのときと同じようにビルドしてGCRにプッシュします。
k8sの設定ファイルは無いので以下のように作ってk8sに適用します。
apiVersion: apps/v1
kind: Deployment
metadata:
  name: grpc-greeter-go
  namespace: default
spec:
  selector:
    matchLabels:
      app: grpc-greeter-go
  replicas: 1
  template:
    metadata:
      labels:
        app: grpc-greeter-go
    spec:
      terminationGracePeriodSeconds: 5
      restartPolicy: Always
      containers:
      - name: main
        image: gcr.io/example/grpc-greeter-go:1.0.0
        imagePullPolicy: Always
---
apiVersion: v1
kind: Service
metadata:
  name: grpc-greeter-go
  namespace: default
spec:
  selector:
    app: grpc-greeter-go
  ports:
  - name: grpc
    port: 80
    protocol: TCP
    targetPort: 50051
Virtual Serviceを変更して適用します。
apiVersion: networking.istio.io/v1alpha3
kind: VirtualService
metadata:
  name: example
  namespace: default
spec:
  gateways:
  - example
  hosts:
  - "*"
  http:
  - route:
    - destination:
        host: grpc-greeter-go
        port:
          number: 80
疎通確認はclientフォルダにあるGoのプログラムを利用します。TLSの際は以下のようにgrpc.Dialの部分を変更してから接続して確認できます。
config := &tls.Config{
  InsecureSkipVerify: true,
}
conn, err = grpc.Dial(*address, grpc.WithTransportCredentials(credentials.NewTLS(config)))
これで目標であった、gRPCサーバをGKE+Istioで公開することができました。
Istioの各サービス
Istioインストール時にGrafana, Kialiを一緒にインストールしたので確認してみます。最初のインストールのほうでistioctlコマンドを紹介しましたが、dashboardという素敵なコマンドがあり、これを実行すると各サービスをブラウザで開くことができます。istioctlはbrew install istioctlでインストールできます。
Grafana
Grafanaは以下で開くことができます。設定しなければ特にパスワードは必要ないです。
$ istioctl dashboard grafana
Istioのデフォルト設定で、6時間しかデータが保存されないので気をつけてください。長期保存目的のデータはStackdriverのほうをみるといいかなと思います。
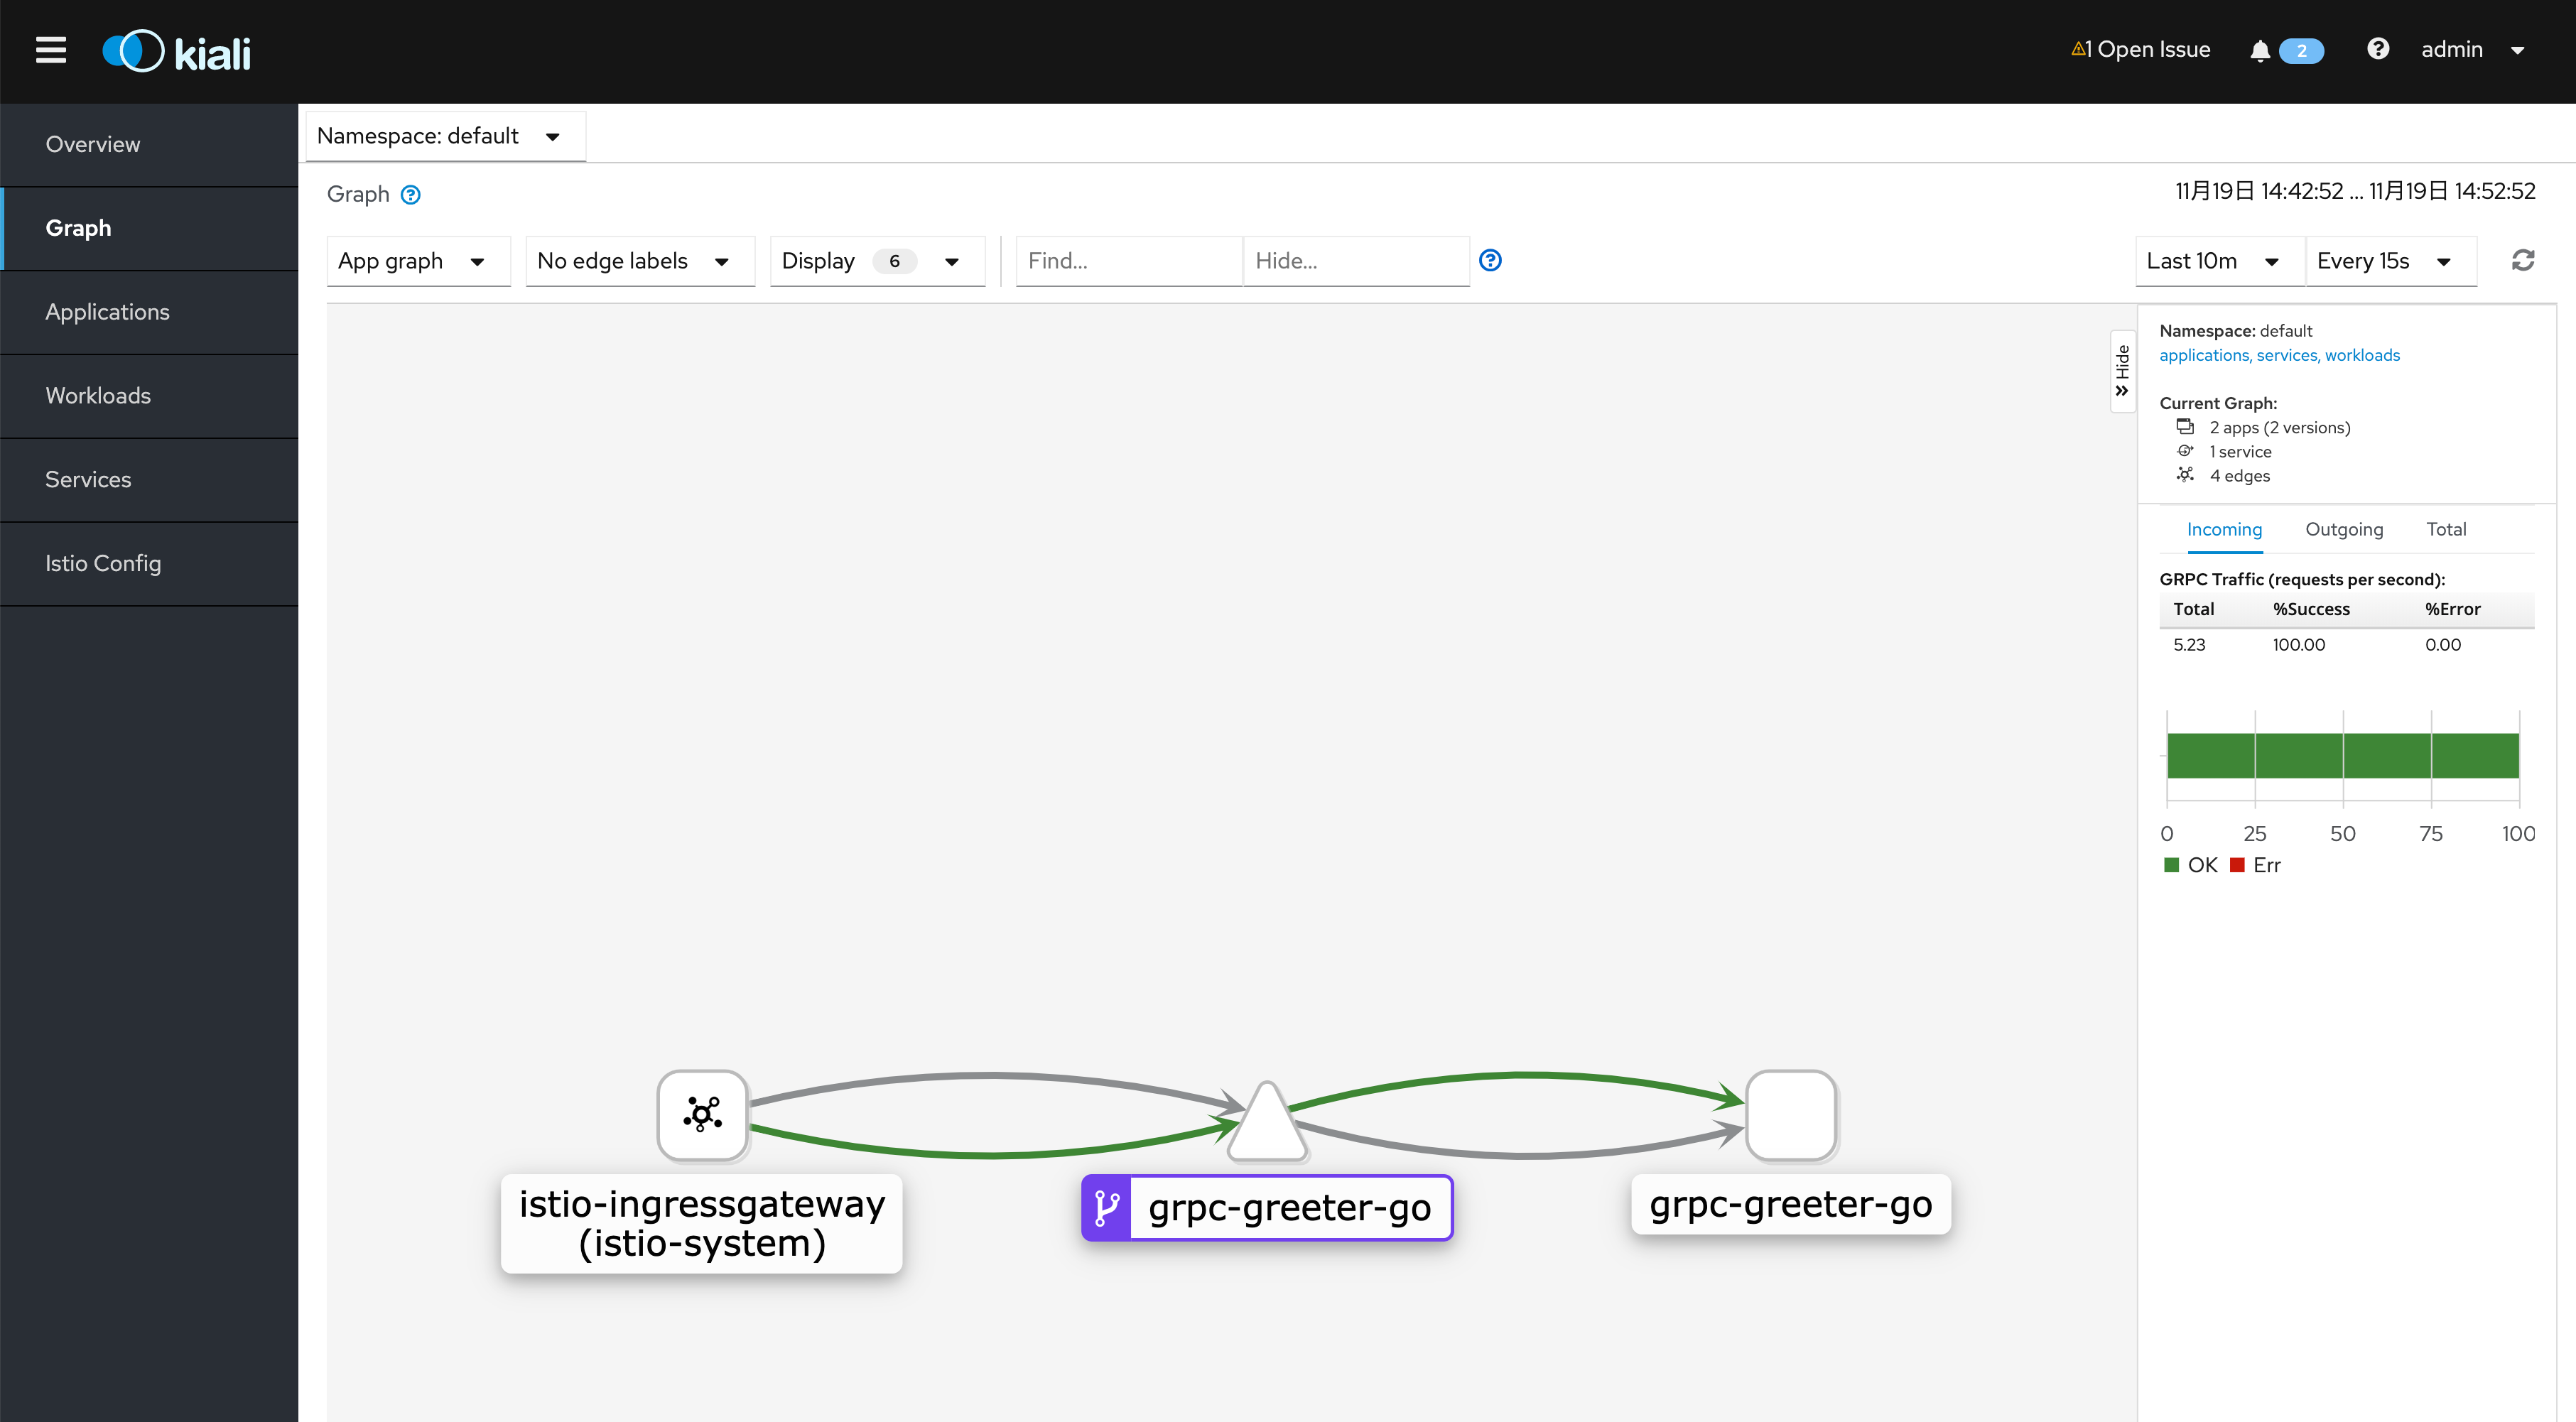
Kiali
Kialiは以下で開くことができます。Istioのインストール時に、kiali.createDemoSecret=trueを設定したのでUsernameがadmin、Passwowdをadminでログインできます。
$ istioctl dashboard kiali
各種項目はありますが、サービス間がどのように接続されていてリクエストが成功しているかどうかは以下でみられるので便利です。
まとめ
この記事で、GKEへIstioをマニュアルでインストールして、gRPCをSSL/TLS通信できるようにしました。サーバ間の監視や、トラフィックのレートリミットなどは自前で実装すると大変ですが、Istioを導入することにより楽にできます。Stackdriver、Prometheus、Grafana、Kialiなどを使った監視は、別途試してみたいと思います。